HTTPS로 통신하고 싶은데
https로 보안 통신을 하고 싶을 때 NGINX를 활용하면 간단하게 보안 통신을 할 수가 있다.
https 통신 관련해서는 아래의 글을 참고해 보자. SSL을 통한 보안 통신에 대한 설명이다.
사전 준비물
- key.pem
- crt.pem
해당 파일들을 아래의 글을 보고 준비해오도록 하자.
HTTPS 통신을 위한 자체 인증 SSL 인증서 만들기
전반적인 과정OpenSSL 다운로드Private Key, Public Key 생성인증서 요청(CSR) 파일 생성(private.csr)자체 서명하기 위해서 rootCA 생성CSR 파일 자체 서명자체 서명한 인증서 생성(private.crt)웹서버에 서버 인증
jettstream.tistory.com
NGINX 설치하기
해당 페이지에서 window용 NGINX를 다운로드하도록 하자.

nginx: download
nginx.org
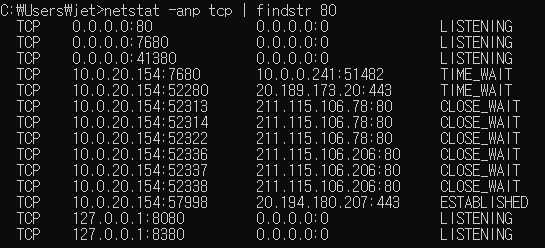
현재 내가 리슨 중인 포트 확인하기
> netstat -anp tcp | findstr 80
명령 프롬프트를 실행해서 해당 명령어를 입력하면 현재 내가 리슨 중인 포트를 확인할 수 있다.
현재는 80 포트를 리스닝하고 있지 않지만 nginx를 실행하면 80 포트를 리슨 하게 될 것이다.

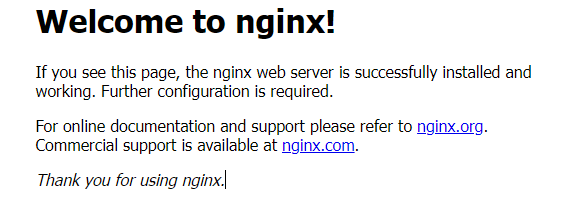
설치한 폴더에 있는 nginx.exe를 실행하면 80 포트를 리슨하게 된다.

해당 설정 파일 확인해 보기
80 포트를 리슨 하도록 설정한 설정 파일이 어딘가에 있을 것이다.
경로 : nginx-1.26.2\nginx-1.26.2\conf\nginx.conf
해당 경로에서 nginx의 설정 파일인 nginx.conf 파일을 열어보면 설정을 확인할 수 있다.
#user  nobody;
worker_processes  1;

#error_log  logs/error.log;
#error_log  logs/error.log  notice;
#error_log  logs/error.log  info;

#pid        logs/nginx.pid;


events {
    worker_connections  1024;
}


http {
    include       mime.types;
    default_type  application/octet-stream;

    #log_format  main  '$remote_addr - $remote_user [$time_local] "$request" '
    #                  '$status $body_bytes_sent "$http_referer" '
    #                  '"$http_user_agent" "$http_x_forwarded_for"';

    #access_log  logs/access.log  main;

    sendfile        on;
    #tcp_nopush     on;

    #keepalive_timeout  0;
    keepalive_timeout  65;

    #gzip  on;

    server {
        listen       80;
        server_name  localhost;

        #charset koi8-r;

        #access_log  logs/host.access.log  main;

        location / {
            root   html;
            index  index.html index.htm;
        }

        #error_page  404              /404.html;

        # redirect server error pages to the static page /50x.html
        #
        error_page   500 502 503 504  /50x.html;
        location = /50x.html {
            root   html;
        }

        # proxy the PHP scripts to Apache listening on 127.0.0.1:80
        #
        #location ~ \.php$ {
        #    proxy_pass   http://127.0.0.1;
        #}

        # pass the PHP scripts to FastCGI server listening on 127.0.0.1:9000
        #
        #location ~ \.php$ {
        #    root           html;
        #    fastcgi_pass   127.0.0.1:9000;
        #    fastcgi_index  index.php;
        #    fastcgi_param  SCRIPT_FILENAME  /scripts$fastcgi_script_name;
        #    include        fastcgi_params;
        #}

        # deny access to .htaccess files, if Apache's document root
        # concurs with nginx's one
        #
        #location ~ /\.ht {
        #    deny  all;
        #}
    }


    # another virtual host using mix of IP-, name-, and port-based configuration
    #
    #server {
    #    listen       8000;
    #    listen       somename:8080;
    #    server_name  somename  alias  another.alias;

    #    location / {
    #        root   html;
    #        index  index.html index.htm;
    #    }
    #}


    # HTTPS server
    #
    #server {
    #    listen       443 ssl;
    #    server_name  localhost;

    #    ssl_certificate      cert.pem;
    #    ssl_certificate_key  cert.key;

    #    ssl_session_cache    shared:SSL:1m;
    #    ssl_session_timeout  5m;

    #    ssl_ciphers  HIGH:!aNULL:!MD5;
    #    ssl_prefer_server_ciphers  on;

    #    location / {
    #        root   html;
    #        index  index.html index.htm;
    #    }
    #}

}
해당 부분의 설정을 통해서 80 포트를 리슨 하게 된다.
HTTPS 보안 연결을 위한 conf 파일 작성 예제
server {
		listen 443 ssl; (1.15 버젼 부터는 listen 443 ssl; 형식으로 변경됨)
		server_name www.sslcert.co.kr sslcert.co.kr; (지정한 서버인증서에 포함(지원)된 도메인)
		ssl_certificate_key /파일경로/www.sslcert.co.kr.key.pem; (개인키 파일 지정)
		ssl_certificate /파일경로/www.sslcert.co.kr.all.crt.pem; (서버인증서+체인+루트 통합 unified 파일 지정)
		ssl_protocols TLSv1.2; (서버 환경에 따라 선택적 적용)

		location /
			root path
	}
}
localhost:80으로 접속
NGINX 종료하기
명령어 : .\nginx.exe -s stop
압축을 해제한 폴더에서 위의 명령어를 입력해 주면 NGINX 실행이 종료된다.


참고 사이트
nginx 로 https 연결 하기! (feat. cafe24)
nginx를 사용하면 간편하게 https 연결을 할 수 있다고한다. 실제로 backend에서 세팅하는것보다 쉬웠다!서버 : 카페24 호스팅 서버 인증서 : 카페24에서 구매도메인 : 카페24에서 구매개발 환경 자체가
velog.io
NGINX 윈도우 설치하기
NGINX 윈도우 설치하기 Installing NGINX Windows 윈도우에 NGINX(엔진엑스)를 설치하는 방법에 대해 알아보겠습니다. 1. NGINX 다운받기 🔗 아래 링크에서 Windows Stable 버전을 다운받습니다. 다운링크: http://
bakingdevlog.tistory.com
'프로그래밍' 카테고리의 다른 글
| SSL 인증서의 유효기간은 왜 1년인가? (1) | 2024.09.10 |
|---|---|
| EC2 생성시 발급받은 키 페어 .pem을 .ppk로 변경해보자 (1) | 2024.09.06 |
| 스핀락(Spin Lock)에 대해서 알아보자 (0) | 2024.08.13 |
| 스레드 생성 이후에 언제 Handle을 반환해야 할까? (0) | 2024.08.07 |
| 64진수로 바꿔보자! Base64 인코딩 (3) | 2024.07.24 |


댓글